The Fortress

|
1 hour
|

|
From 11am
|

|
Sandstone
|
|
|
Introduction
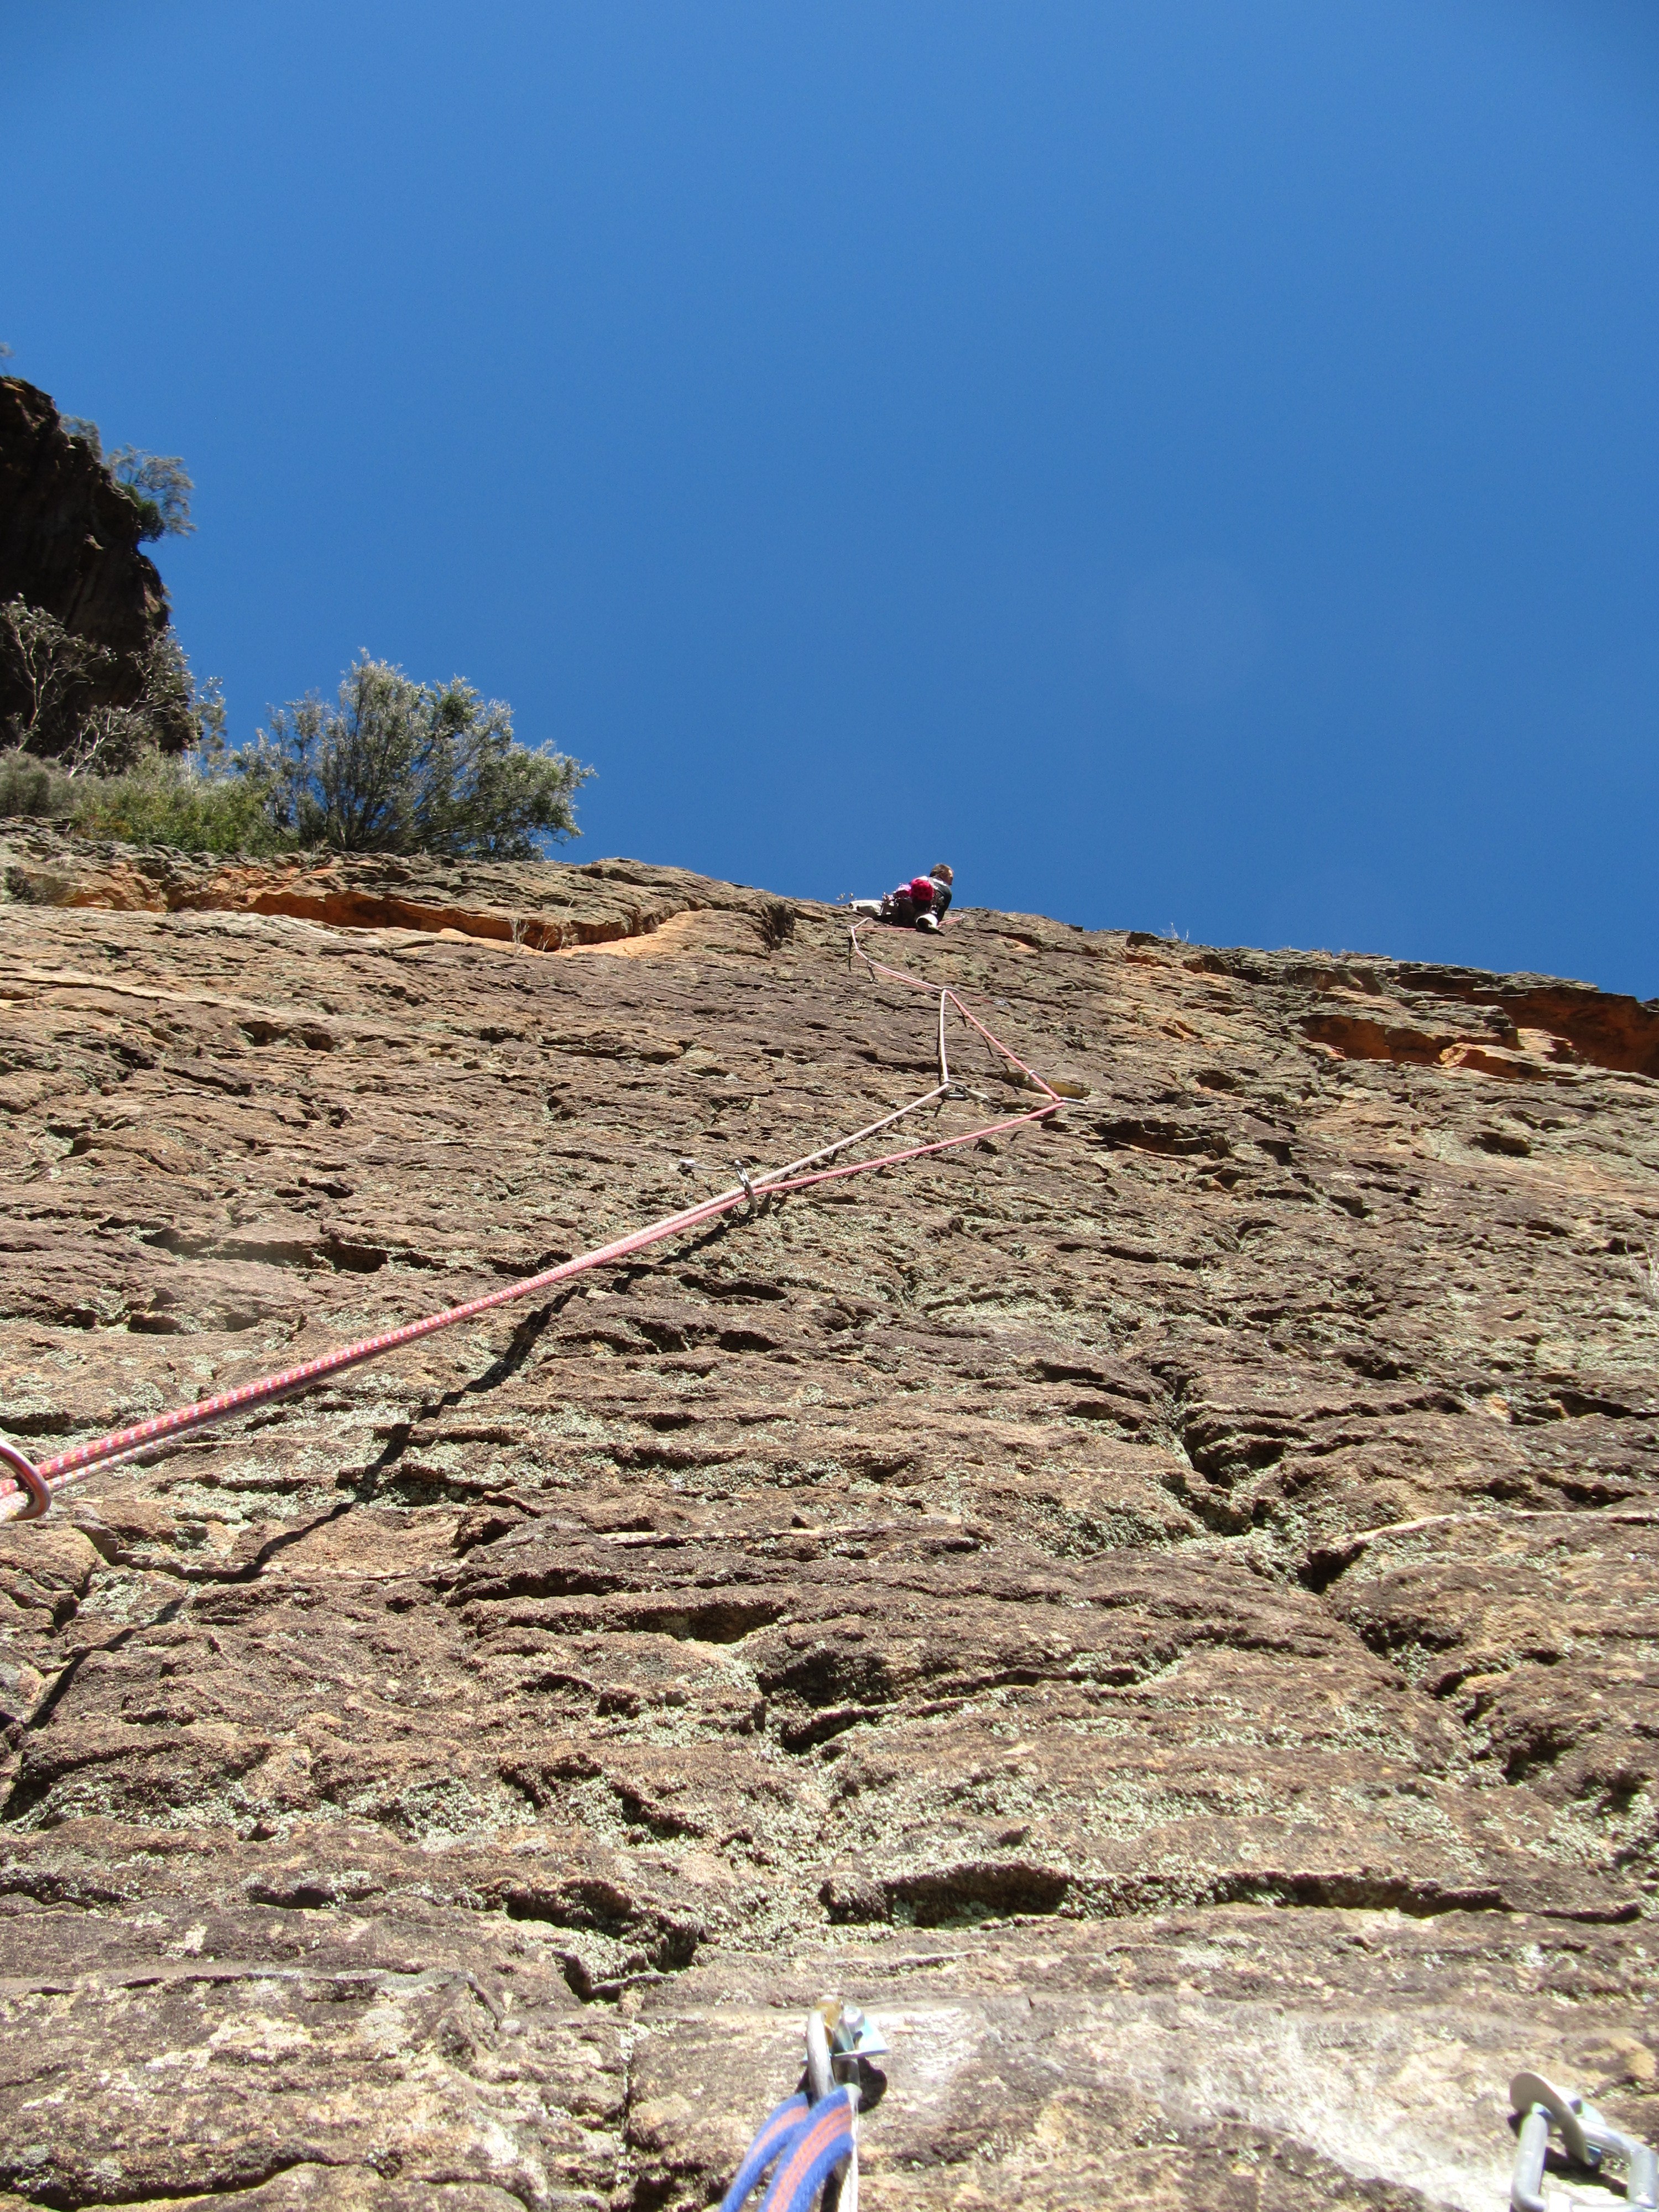
An airy wall in a beautiful spot.
|
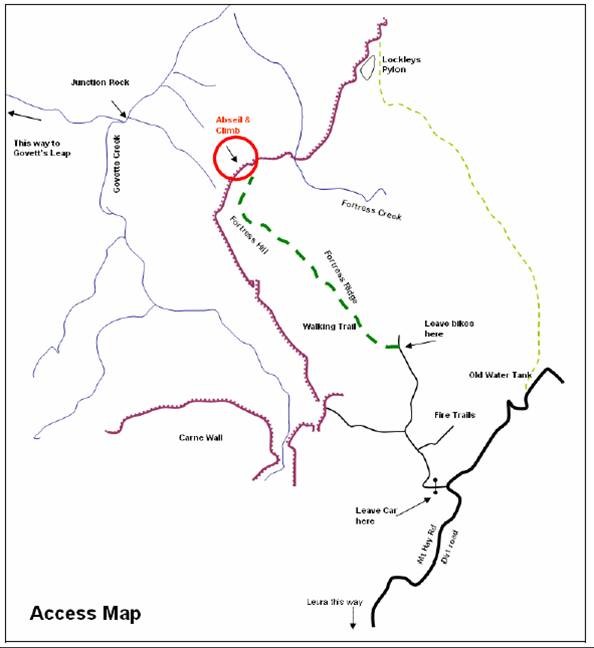
Access
At Leura drive up to the road that crosses the highway (Leura mall) and turn north. Turn right onto Victory lane and Churchill St (I wonder when those roads were named) and left onto Mt Hay Road. Drive to the Fortress Ridge turn off on the left (sign posted), about 20 minutes 7km. There is a locked gate. Leave car here and walk about an hour out along the ridge till almost the end and then veer right onto the Canyon exit track. Go a few hundred metres slightly downwards, then along the base of a small cliffline on your left. For the climbs on the north end (Voytek's corner etc) follow the track down and left (North) along the clifftop. For most climbs, turn left where the track opens to the main valley.Once you leave the track, be careful when approaching the cliff edge. Although it is very easy ground, some people have felt more comfortable using a rope and belay. It is easy to slip or trip-over with a potentially fatal slide. Retreat options are - Walk down to the valley and out up Rodrigez Pass, then somehow get back to your car and gear (ps, carry your carkeys with you perhaps). Escape up an easy climb (Tom Thumb) or possibly walk right and go up the 'descent gully' right of Rib and Slab, I don't know how feasible this is.
|
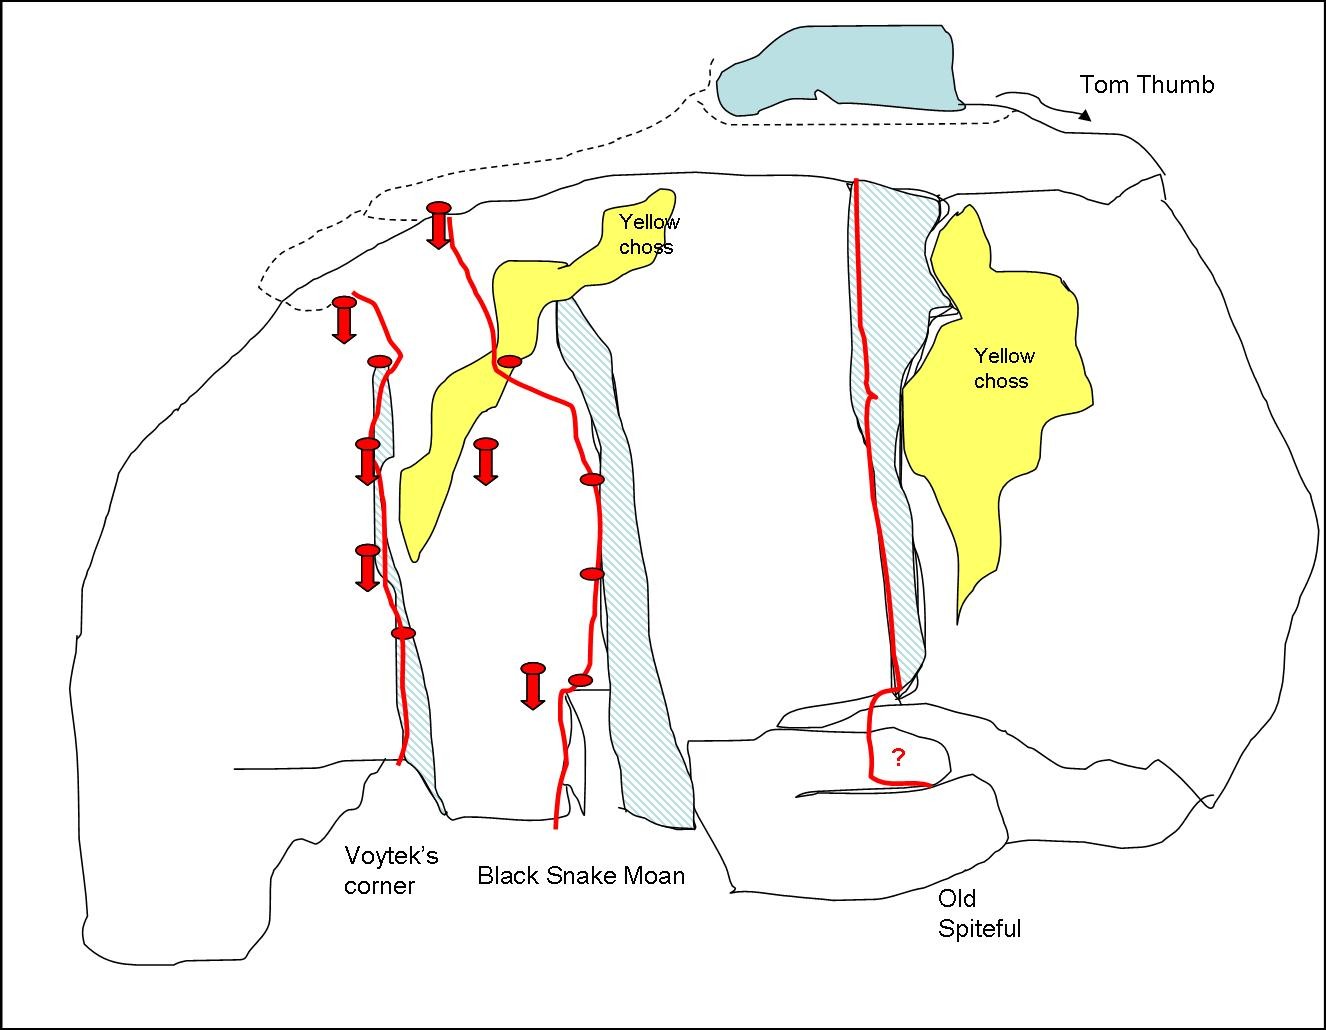
Left hand routes
View of North end from further north, Shaded bits are corners
|
|
Voytek’s Corner
|
24
|
150m
|
|
|
Hard corner with abseil access/inspection. About 200m down the clifftop ridge heading ENE from where the Tom Thumb track leaves the canyoner’s track, first pass a small level rock pad (top of Black Snake Moan) and then about 40m past that traverse left (facing out) along bushy ledge to top of corner and 2 carrots. Abseil 55m to 2 carrot belay, 30m to 2 carrots on ledge and 55m to ledge/start. Gear was preplaced on “abseil pitch 3”, is this the third abseil or the third pitch? Anyway, you’ve been warned.
Std rack and lotsa finger sized wires.
1) 25m (23) Start in corner, up and out Left, cordelettes as gear(?) back into corner and hard high step, left and up to ledge, DBB.
2) 30m (19) Up left onto R leaning ramp and up left of corner to rooflet, over and left to ledge DBB.
3) 30m (21) up wall/scoops right of belay to ledge
4) 30m (24) Up corner to tree. Peg, bolt and wires.
5) 25m (19) Up R of Banksia, up slightly R to find break for cams, up tending L to ledge and move left to DBB.
|
|
Zac Vertrees, Frank Moon 2010
|
|
|
Black Snake Moan
|
22
|
200m
|
|
|
Corner system breaking out onto wall. About 150m down the ridge as described above find small level rock pad. Traverse left (facing out) along bushy ledge to bottomless corner and 3 carrots on block. Rap 60m to fixed brackets, 60m to fixed brackets, 40m to ground. Walk R to corner.
1) 30m (18) Up corner to ledge, walk R
2) 30m (18) up corner and roof to ledge. Mixed gear belay.
3) 25m (21) Out R, up crack and back inot corner. Up awkwardly to ledge. Don’t fall on ledge.
4) 50m (17) Up corner for about 30m to horizontal and orange rock. Traverse L (runout) to 3BB at ledge/overhang.
5) 50m (22) Up and Left , follow carrots, hangers and breaks for cams to corner and up the first bolt abseil anchor.
|
|
Frank Moon, Zac Vertrees, Damo Taylor 2008
|
|
|
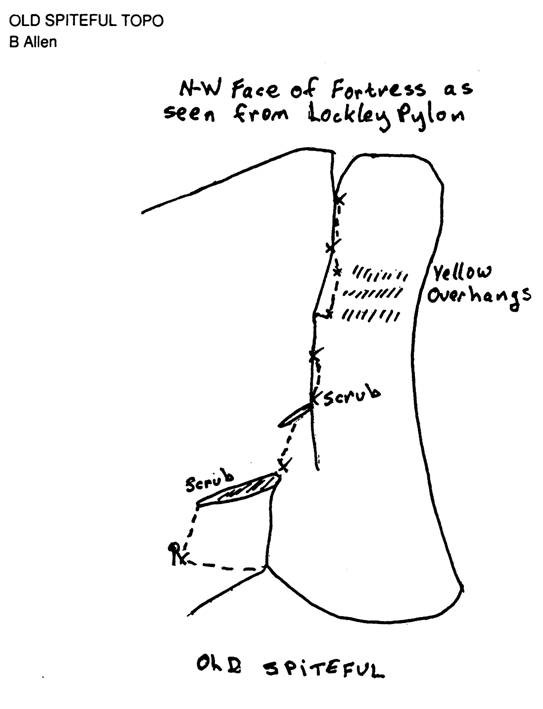
Old Spiteful
|
15
|
300m
|
|
|
A large obvious crack capped by a chimney that can be seen anywhere from Lockley’s pylon to Perrys Lookdown (but not from junction Rock). A magnificent long climb but not the most pleasant. Start in the corner. This is pretty much beklow where the tom Thumb track veers off the canyoner's track.
1) 32m Traverse left along a very rotten ledge
2) 30m Easily up the ramp on right
3) 30m Scramble below next corner
4) 30m The left side is probably the easiest but has its problems. Up to the next short ledge.
5) 15m Battle up the crack, very good bolt belay ? (3 ¼”)
6) 34m Up layback crack and a short manoeuvre right at the top.
7) 27m Move easily up the right-hand crack on rotten white rock. Bolt Belay beneath overhang (3 ¼”)
8) 4m (the pitch length may be a misprint. This makes the climb 260 m, even if it were 34m it would only make the climb 290 m). Up the next short wall via your second’s back (tricky). Along ledge to tree belay. An easier way might be found further to the right then back along the same ledge.
9) 34m Up the lousy rotten filthy gully to the back of the chimney. Only a stance belay.
10) 24m Up the chimney then out on the right to finish.
|
|
Ted Batty, Bryden Allen 1963
|
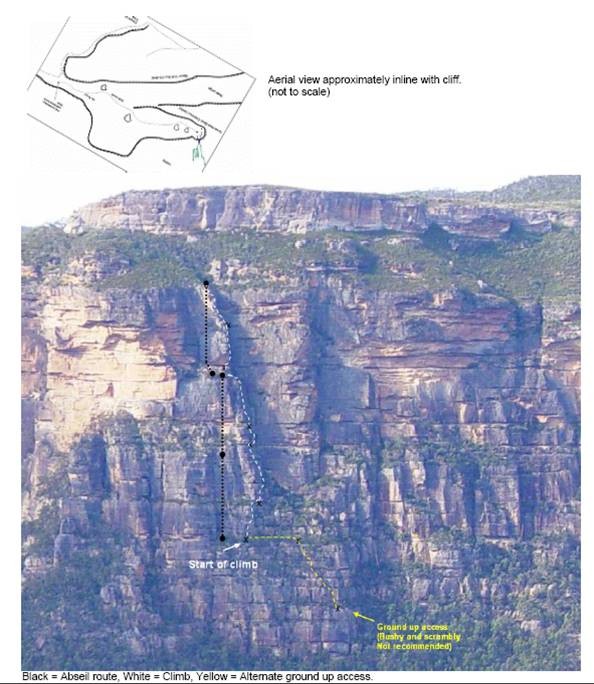
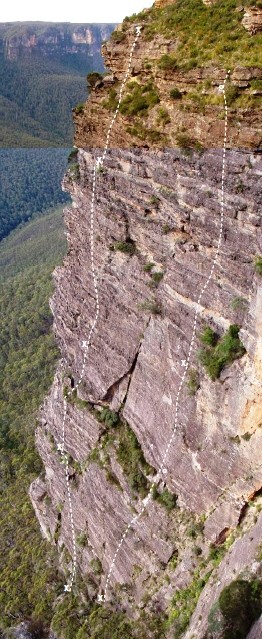
Abseils
A fun trip in itself. You’ll need 2 x 50m ropes used canyon style (meaning you’ll pull them down for each rappel).
The first abseil has 3 x carrot bolts and 2 chains. The second and third abseil anchors have two large u-bolts or loops that can be threaded directly with the rope.
Pay close attention not to tangle your ropes.
Abseil one (47m) is a bit exciting as you go over the lip. Stop virtually at the end of the rope on the lower (lowest you reasonably can?) bushy ledge (5m below the cave ledge). See picture 4 for details. Walk right 8m facing the cliff, through bushes to the u-bolt anchors.
Abseil two (45m). Stop at the u-bolts 5m below the large bushy ledge.
Abseil three (48m) uses virtually the full rope to get you on large bushy ledge with trees.
Walk right about 10m to start of climb. In this sea of bubbling buttresses there is a small cairn in a slight corner. The first bolt should be visible about 3m up.
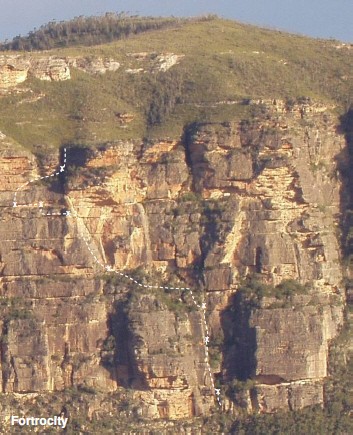
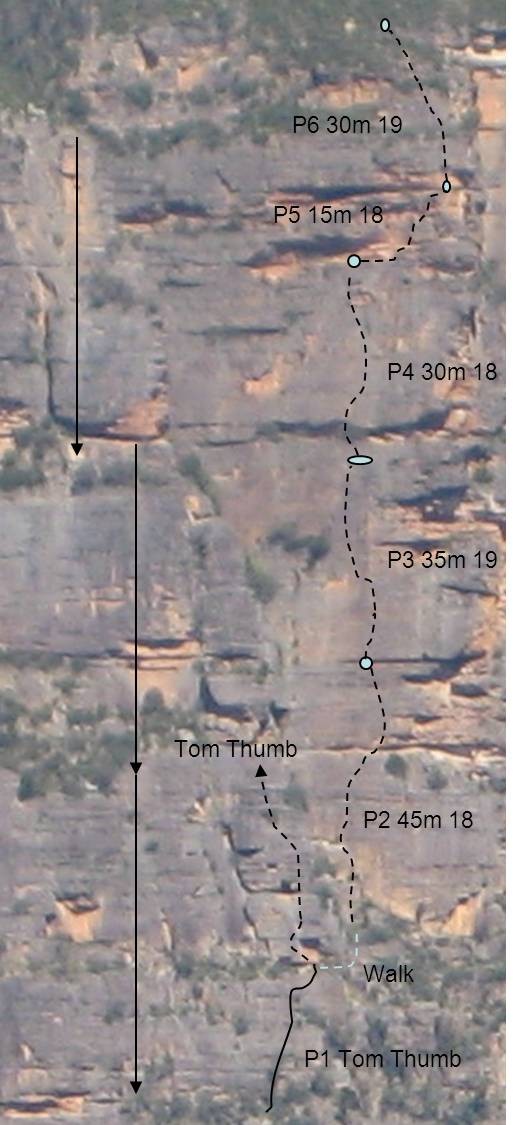
Abseils and line of Tom Thumb
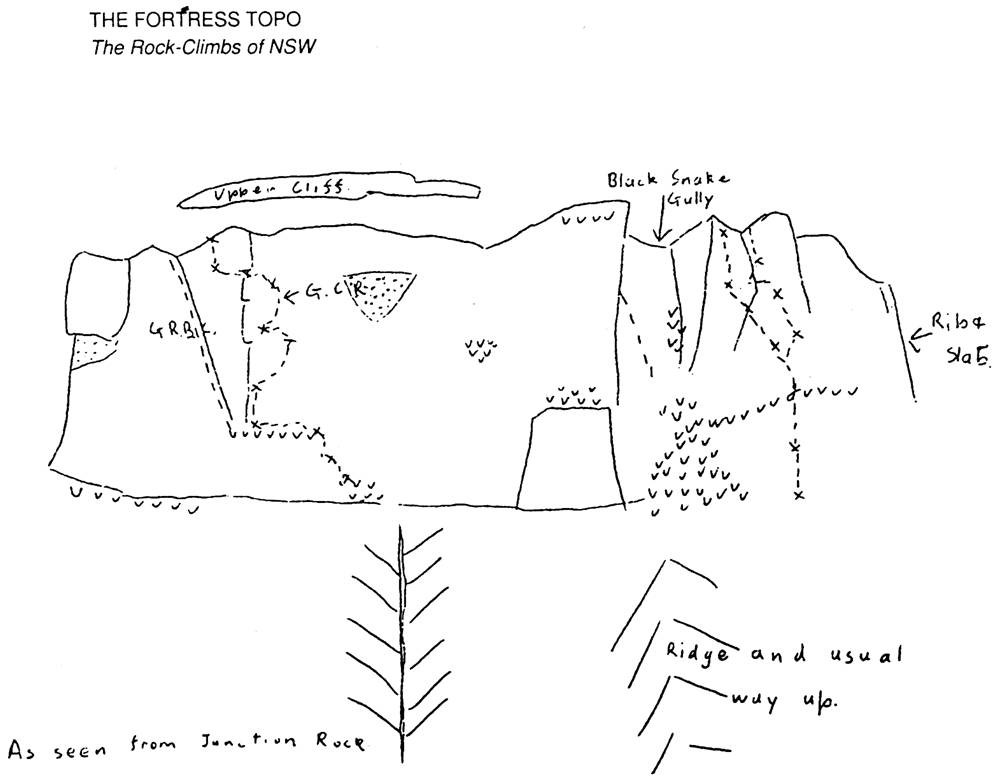
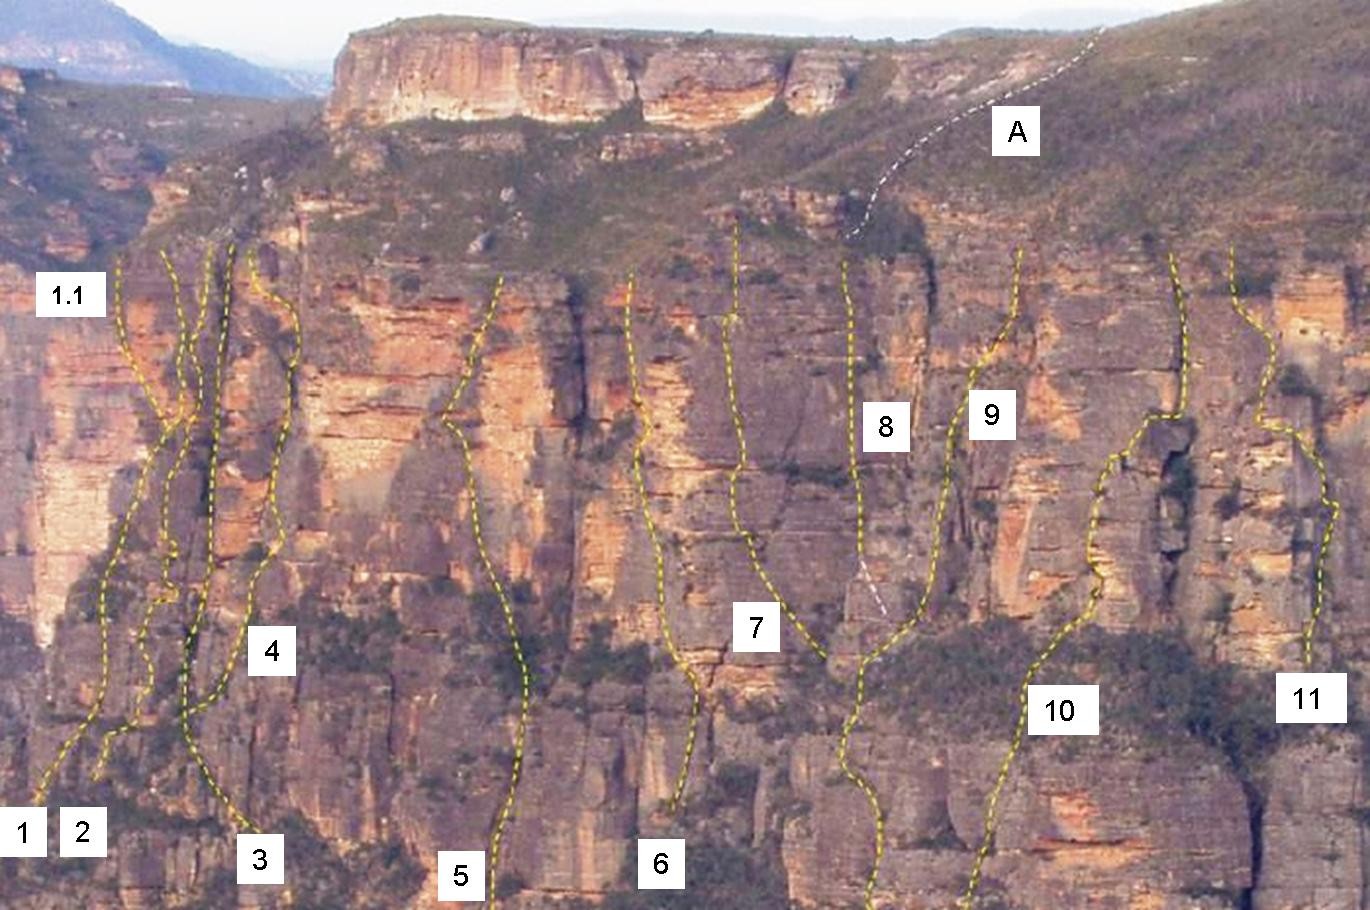
Old fortress topo from Warwick Williams guide
1 Trojan Horse
1.1 Eeyore’s Alternative
2Tom Thumb
3 Great Rum Beer Chimney
4 Grand central Route
5 Fortrocity
6 Self Abuse
7 Pseudechis Wall
8 Trouser Snake
9 Another Kevin Westren climb
10 Butt Crack
11 Scunge Bob Scare Pants
|
|
Trojan Horse
|
14
|
205m
|
|
|
When approaching the Fortress from the left, there is a small “viewing” buttress that allows one to look
across the main face. From here, the general line can be seen running leftwards along a series of slabs,
parallel with the Great Rum Beer Chimney (see diagram). From the base of the Fortress, the top part of the
climb appears to overhang. A direct start remains to be done.
Start: Descend the gully between the “viewing” buttress and the Fortress for 15m and traverse right along
narrow ledge for about 60m (ropes may be used, but not necessary).
1. 45m Pleasant scramble in sneakers up weakness to large ledge.
2. 25m (move belay 10m right.) Up nobby wall to ledge.
3. 22m (crux) Step off detached pillar onto steep wall moving left to arete and up left wall.
4. 25m Left around arete and up juggy wall to vegetated ledge.
(Traverse 50m left towards large tree at base of main corner)
5. 43m Up crack and wall and scramble right to chimney.
6. 45m Up left wall. Up, up and away.
|
|
Hayden Brotchie, Paul Davies (alternate Leads) 22.8.97
|
|
|
Eeyore's Alternate
|
15
|
55m
|
|
|
Takes the diagonal crack left of the Tom Thumb Abseil.
Alternative finish to Trojan Horse. Much easier than anticipated. Access: Abseil 50m as for Tom
Thumb.
1. 25m. Up grey slabs generally following crack. Belay in yellow rock where climbing becomes steep.
2. 30m. (Crux) A trick move up. Then either climb a few moves right and up (less steep) to gain ledge above. Or move left and up on overhanging yellow rock (better then it looks). Move left and up 20m to top.
|
|
Hayden Brotchie, Angie Bishop. 20.12.2004
|
|
|
Landing Gear Down
|
16
|
98m
|
|
|
Varient to Tom Thumb, like many other routes in the area.
1) 18m (10) Start 12m L of TT at weakness in black wall. Up to ledge and base iof knuckle sized crack corner.
2) 40m (14) Up crack and climb wall out L to ledge 3m R of lowest abseil anchors for TT.
3) 40m (16) Up yellow corner and R side of bulge and move L up buttress to join TT at end of TT pitch 4.
|
|
Frank Moon, Bruce Cameron, John Ewbank 2009
|
|
* * *
|
Tom Thumb
|
13
|
150m
|
|
|
The crag classic. From the last abseil walk right about 10m to start of climb. In this sea of bubbling buttresses there is a small cairn in a slight corner. The first bolt should be visible about 3m up.
1) 18m (8) Up a few metres to bolt (used more to show direction than for protection). Up to vertical crack for pro and up bulbous wall (another bolt on right) to DBB at top of buttress. WALK UP AND RIGHT 8 metres to start of next pitch. DBB on wall.
2) 40m (12) Left of belay grunt onto wall. Natural pro in crack or horizontal breaks up higher. Clip bolt on left. Then move diagonally right to small friend (#0) in horizontal crack and further rightwards on easy stuff to bolt (clip with sling to reduce drag). Up left clipping two bolts, steep tricky move (easiest if you move left). Easy 10m ramble with two bolts to DBB. Best to give your second a tight rope when they start the pitch.
3) 16m (9) Bolt on right shows the way, then up crack on left to belay. (Bolt and #½ friend.)
4) 45m (8) From right of the belay move up a few metres, then traverse left past bolt (4m above and 1 m left of belay) runner to arête/ridge. Up ridge 30m past 4 bolts. Walk across rightwards to bolt on little buttress. Over this and walk 10m+ (no bolt protection) and scramble through small bushes up easy crack into cave to DBB.
5) 21m (12) From belay start to the right. Up wall trending left past 4 bolts. Climb onto large blocks at top. They seem OK. And traverse right passing bolt that protects the second to DBB.
6) 26m (8) Clip bolt on right of belay. Stand on rock thing and up. Follow ridge with a few bolts to top. DBB.
|
|
Hayden Brotchie, Jenny Bradford. October 2004
|
|
|
The great Rum Beer Chimney
|
8
|
120m
|
|
|
Chimney gully right of Tom Thumb
|
|
|
|
* *
|
The Wind cries Mary
|
20
|
180m
|
|
|
Nice Cosmic County style climbing with bolts and cams, generally well protected, except where it isn't. Rap in and pitch 1 as for Tom Thumb.
1) 18m 8 (As for Tom Thumb). Up a few metres to bolt (used more to show direction than for protection). Up to vertical crack for pro and up bulbous wall (another bolt on right that I can't ever find) to bolt at top of buttress. Walk up and right 8 metres to DBB on wall for Tom Thumb. From here walk right and up gully for 10m.
2) 45m 18 Climb the block between the gully and the smooth wall on the right past a bolt, then the layback crack to the top of the block. Head right past bolts into crack and right to orange steep bit past many bolts and cams to triple bolt belay above break (clip first bolt of 3rd pitch+carrot+anchor screw bolt).
3) 35m 19 head up in the 12.30 o’clock direction (or about 20 degrees right) past bolts (cams optional), then left past 2 bolts into corner and up (cams in figer slot) steep wall past 2 BRs to a triple bolt belay just below the cave.
4) 30m 18 Up to cave and bush runner. Rightwards 12.30 o’clock past 3 BRs and cams then leftwards up corner and easy arête to DBB on big ledge (carrot/anchor screw). Gear is only average and we've seen a great 13m flyer on this pitch.
5) 15 m 18 Right and up through 2 waves of rock passing 5BRs, walk R 4m to belay on high bolt and Ubolt and an old bolt from Grand Central Route at foot level.
6) 30m 19 Juggy up steep wall past 2 BRs and sling, then walk to 10m wall. Walk up belay on 2 bolts at left end of 2nd band. Walk up 10m and left 40m to track.
Original finish went left into choss
|
|
Mikl, Brian Simonds, Ness, Mark Wilson June 2011
|
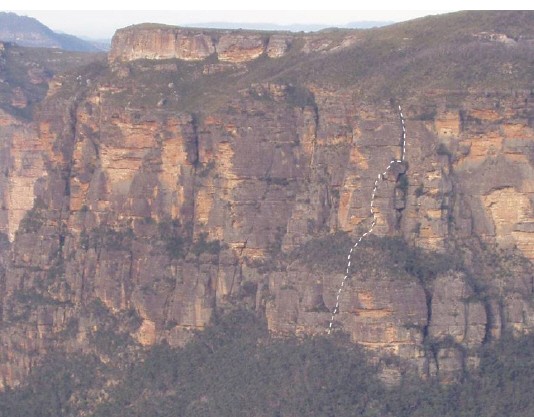
Line of The Wind Cries Mary
mikl on P3 of The Wind Cries Mary on the FA
|
|
Grand Central Route
|
12
|
212m
|
|
|
A magnificent climb up the centre of the face of great variety. Originally started by scrambling up from the right (see topo) but you could come in from the base of the Tom thumb abseils and hit it at about P4.
1) 6m Start in the corner with a short wall on the left. Up the wall (tricky if wet) then around to the left, piton belay.
2) 9m Up crack above then out into the scrub.
3) 36m Up through scrub and walk around to the left along a sandy overhung ledge.
4) 24m Belay (piton) below a vertical corner with a rectangular block blocking the start. Up over the block then up the corner and then the right-hand face.
5) 34m Up the magnificent wall on the right traversing to the middle. Tree belay.
6) 6m Further up then back into the gully.
7) 27m Up the gully till one strikes bush.
Push on and just before one sneaks off left there is a bolt belay on top of yellow rock.
8) 21m Traverse left and up till confronted by a short yellow wall, up (easier than it looks) and a bolt belay on top (this is in the middle of the last pitch of The Wind Cries Mary).
9) 30m walk left 30m belay on yellow rock old bolt.
10) 18m Sneak up the overhang
11) walk up the grass then the 3m remaining wall
|
|
Bryden Allen, Ian Logan December 1962
|
|
|
Internal Hatred
|
15
|
162m
|
|
|
Takes the big chimney on the right side of Black Snake Gully.
Start: On the left side of Black Snake Gully.
1. 60m Up over short corner and slabs. (20m scramble to main gully wall.)
2. 35m (crux) Left side of main wall, up moving rightward pass tree. Directly up wall with minimal
protection to ledge. Take time with the belay.
3. 32m Right side of gully, up over loose vegetation into chimney. Could be a slippery pitch after rain.
Bolt and large friend for belay.
4. 20m Up chimney passed bolt runner and behind large chock stone to unique man-hole belay at back
of chimney.
5. 15m Up chimney, left out into exposure. Extend belay 15m back to gum trees.
|
|
Hayden Brotchie, Andrew Jones (Alternate leads) 16.8.97
|
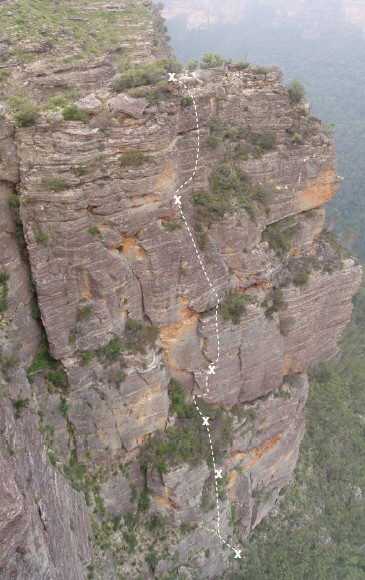
Line of Fortrocity
|
|
Fortrocity
|
16
|
155m
|
|
|
This climb takes the diagonal slash on the middle of the Fortress. Direct starts and finishes to be
done everywhere.
Start: The first gully about 80m left of Black Snake Gully.
1. 10m Up easy gully to ledge. Bush belay.
2. 30m Left onto rock buttress and around arête. Up lovely wall and arête. Belay on small tree,
rock thread and piton (not in place).
3. 20m (Crux) Climb right of arête and 8m rightwards into chimney. Up chimney to ledge. Tree
belay.
(Walk left 50m to major yellow corner and grey slab)
4. 40m Up grey slab on left of corner, escaping left onto ledge near top.
5. 15m Walk left 10m and climb 5m to next ledge.
(Walk 10m left where it’s easiest to climb up)
6. 30m Up juggy wall moving right to easy gully with some water.
7. 10m. Up gully to top.
|
|
John Croker, Warwick Williams and Hayden Brotchie 28.12.04
|
Black Snake Gully
Access: Abseil down Trouser Snake. The U-bolt anchors are about 2 metres down from the cliff
top. 46m Abseil to ring bolts. Then another 37m to ground.
(Note: abseil anchor has terrible rope
drag. So be very careful not to tangle ropes. An alternative abseil point should be found in future.)
|
|
Pseudechis Wall
|
12
|
115m
|
|
|
Takes the black wall on the left of Black Snake gully. The route crosses the diagonal slash at the
end of pitch one (from right to left). Easy by grade with jugs to haul on, but very run out.
Start: About 15m below Trouser Snake and about 25m before the gullies back wall on the second
lower ledge (Start at the easiest spot to get onto the wall, that is not overhanging. There is an offwidth
corner crack just to the right of the start.
1. 40m. Gain wall and climb diagonally leftwards. Vertical crack for protection at 25m. Continue leftwards and up to boulder thread runner at small cave. Climb over cave and left 3m. Belay on ledge from small tree and cams in horizontal break.
2. 35m. Up wall onto large ledge and cave. Gain next wall on the right. Belay in middle of wall using horizontal cam placements.
3. 25m. (Crux) up wall on big holds. Horizontal break for friend protection about 20m up! Belay in cave with small bush.
4. 15m. Right, out of cave and easy up wall to top.
|
|
Hayden Brotchie, Angie Bishop – 1.1.2005
|
|
|
Trouser snake
|
14
|
85m
|
|
|
Good climbing on the lower part of the climb. However, the rock gets steeper and more fragile higher up. The first pitch is bolted and the second pitch requires some natural gear near the top.
Start: From the ground level platform at the back
of the gully. About 10m back from the rear gully
wall.
1. 50m. Up wall follow 7 bolts – optionally some cams from protection. Up water hardened slab to triple bolt belay.
2. 35m. Continue up wall steepening in parts (various bolts and cams for protection). Good holds and pro, however, rock quality decreases.
|
|
Angie Bishop, Hayden Brotchie – 1.1.2005
|
|
|
Butt Crack
|
10
|
142m
|
|
|
Nice views to around to Cairn Wall. The climb may be longer then described.
Start: At the right hand end of Fortress, about 100m past Black Snake Gully where the cliff rounds the
corner. See picture for details.
1. 17m Very easy unroped scrambling up to corner and left wall.
2. 28m Up corner and out left onto juggy face. Up to large ledge with trees. (Move 20m left and up to
corner crack).
3. 25m Up crack and right wall passed spectacular look-through cave. Belay on ledge behind pinnacle.
4. 17m Up in the middle of pleasant slab with some dinner plates. Belay on flat ledge.
5. 20m Step over big hole and climb vertical chimney behind with good protection to tree belay on large
chock stone.
6. 35m Up chimney and out.
|
|
Hayden Brotchie 31.8.97 (back-rope solo)
|
Line of the mighty Butt Crack
|
|
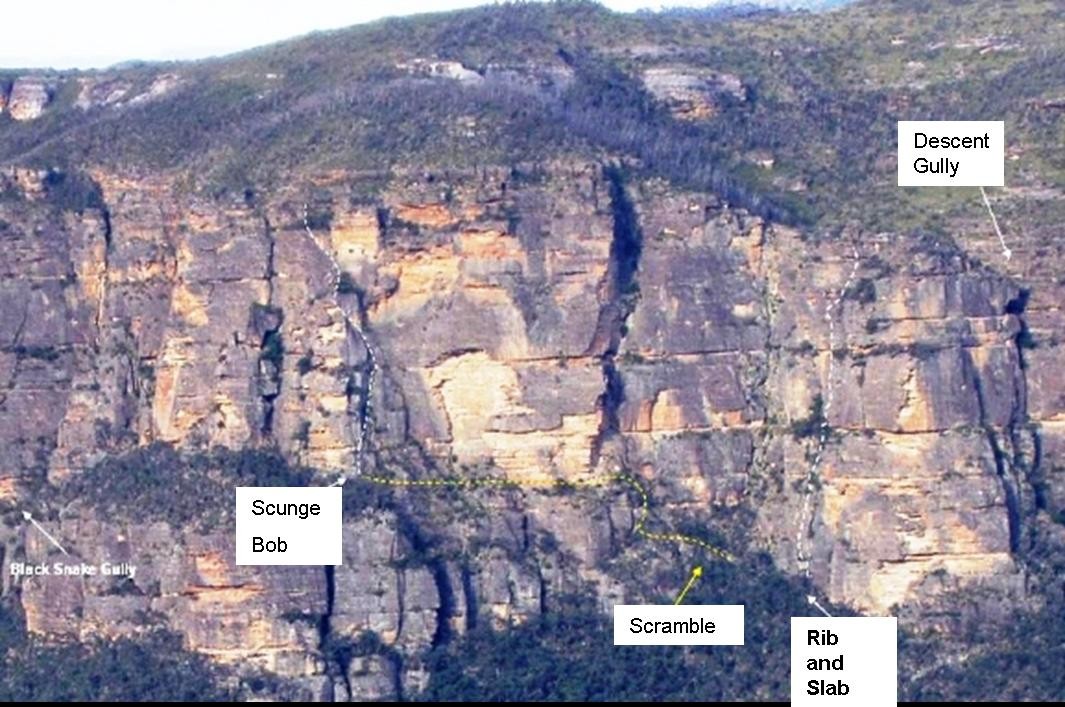
Scunge Bob Scare Pants
|
13
|
116m
|
|
|
Angie’s mank apprenticeship. Scary and horrible for the grade.
Access: Originally descended via the gully that faces Evans lookout. Three abseils – The first uses
a tree to rappel 10 metres to gain top of slot. Then from another tree, abseil 45m down wet open
slot. Finally descend another 10 metres from a rock bollard.
To reach the climb scramble up near the Rib and Slab climb, then move leftward and up towards a
big corner. From the corner base walk/scramble left for 100m via a red ledge. The climb starts on
the right of a buttress.
1. 50m Scramble up buttress on right. Then move right into corner, up slabs and horrible scunge
with surprisingly ok pro to platform on right. Good crack for belay.
2. 30m (crux) Move back left to chimney thing. Up this bicycling boulders as you go till good tree
runner at top. Move left following tempting (but horrible again) slab and diagonal crack. Belay
on ledge with cams.
3. 20m Walk left 8m then up easy 4m on jugs and walk/scramble through bushes up to next
wall.
4. 16m Up wall moving left to next ledge. (Then another easy scramble to top.)
|
|
Hayden Brotchie, Angie Bishop (alt leads) 19 March 2005
|
|
|
Rib and Slab
|
12
|
118m
|
|
|
Re-discovered by Hayden Brotchie and Angela Bishop (26th Feb 2005) we believe this is Kevin’s Rib
and Slab climb. The climbing is pleasant but spoilt by a vegetated pitch.
Access: Abseil down Black gully right of climb.
Start: On the right wall of the major gully, at a slight buttress (see diagram).
1. 40m Easy up cracks and juggy wall to trees.
2. 10m (Ali’s ambush) Cheetah up through rock and trees to base of next wall/overhang.
3. 10m Climb onto the rock (left of chossy grove). Strenuous traverse right across grove
past horizontal break onto wall and then up wall to ledge. Belay using a small chock stone
in back of the crack.
4. 45m Move right from ledge and up steepening wall from 20m, then easy up to ledge.
Bollard belay.
5. 13m Easy up to top.
|
|
Kevin Westren and Co. 1960s
|
Rib and Slab