North Head

|
Crag faces east and south
|

|
Sea cliffs
|
|
|
Introduction
North Head is the hulking headland guarding the northern side of the entrance to Sydney Harbour. Obvious to anyone who's ever sailed in or out through the heads, it's a particularly inspiring line of cliffs. Unfortunately it's also part of the Sydney Harbour National Park, which currently has a ban on climbing. Climbers have been caught and fined for ignoring the ban, and there are also stories circulating of climbers having their equipment confiscated or being locked up overnight.
|
Access
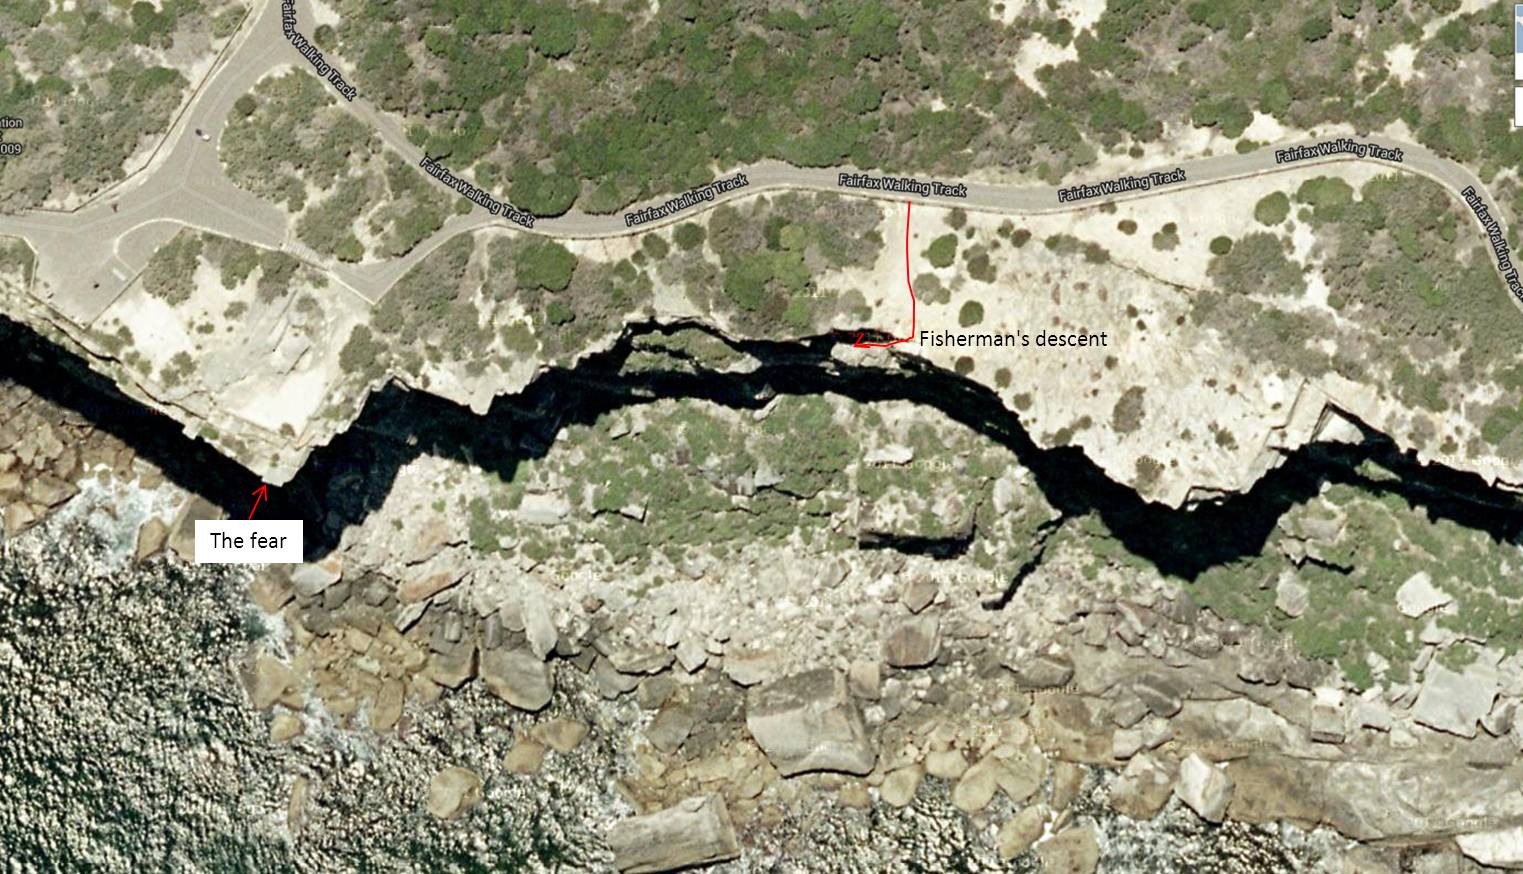
To get to the crag, drive to Manly and follow the signs out to North Head. Park in the carpark (take spare change for the ticket machines), and head south to the lookout that faces the city. The Fear and The Bolt Ladder both top out about 20m east of here (the belay bolt visible just over the fence is for the Fear). The decent is down the fearsome fisherman's ladders about 40m further east again, for The Bolt Ladder and The Fear, stop 20m above the ground and walk back left.
|
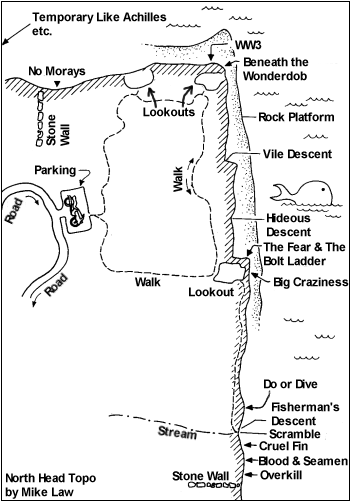
Western Section
The following section of cliff is located to the west of the lookout. From the lookout follow a faint clifftop track to the right (west) facing out, until you find a manky fisherman's descent (just before a small creek).
Climbs described right to left (east to west), facing the cliff.
The following 3 climbs all start from a ledge about a third of the way down the fisherman's descent.
|
*
|
Do or Die
|
20
|
26m
|
|
|
At the far right hand end (facing the cliff) of the ledge. Move right for about 12m above the roof to the arete. Follow this (twin seams) to the top.
|
|
Tom Williams
|
|
|
Scylla
|
17
|
20m
|
|
|
Traverse right for 5m (as for DoD), then follow the groove to the top (take care).
|
|
Tom Williams
|
|
|
Prophylactic Crack
|
20
|
15m
|
|
|
Traverse right for 3m (as for DoD) then follow the thin crack to the top (good pro).
|
|
Tom Williams
|
To get to the following climb, continue down the fisherman's descent, and then head left (east) a few hundred meters, facing the cliff, until you're just before a waterfall (the cliff gets small here). Scramble up to the start of the climb.
|
|
Cruel Fin
|
20
|
17m
|
|
|
Start below corner. Follow the crack across the roof, then continue up the corner (very poor rock and pro) to a ledge. Choss to finish.
|
|
Tom Williams
|
To get to the following 2 climbs, walk past the fisherman's descent, hop the creek and continue for about 40m. Abseil in to a large, high ledge.
|
|
Destroy All Andrews
|
13
|
15m
|
|
|
5m from the right hand end of the ledge. Up the easy wall past horizontals then step left to a short, offwidth corner crack.
|
|
Tom Williams
|
|
*
|
Blood and Seamen
|
17
|
15m
|
|
|
Left of DAA, at the narrowest part of the ledge.
1. 4m Up to wide ledge below corner.
2. 11m (17) Follow the corner past a roof to the top.
|
|
Tom Williams
|
The following 5 routes are all accessed by abseiling in to a bushy terrace, 10m left of BaS.
|
|
Surges
|
16
|
12m
|
|
|
10m left of BaS. Up the flaring crack and grey slab. Step left to seam, then diagonally right across the wall (often wet).
|
|
Tom Williams
|
|
|
Aquatracks
|
16
|
12m
|
|
|
4m left of S. Up the twin cracks to top of detached block. Finish as for S.
|
|
Tom Williams
|
|
|
Can't Spell Caviar
|
18
|
12m
|
|
|
At the far left hand end of the terrace. Up the good looking, rounded arete (poor pro).
|
|
Tom Williams
|
|
|
Darling Debi
|
19
|
14m
|
|
|
3m left of CSC. Up the shallow corner / groove and crack above to a big ledge. Continue to top.
|
|
Tom Williams
|
|
|
Newtown Night's Transfiguration
|
17
|
15m
|
|
|
As for DD. Traverse past DD to a steep crack. Follow this to the ledge and thence to the top.
|
|
Tom Williams
|
The following route is accessed by abseiling in to a rock platform just above water level, about 20m left of the bushy terrace.
|
*
|
Overkill
|
20
|
30m
|
|
|
Good climbing, but often wet. Follow the flaring steep corner crack up to the roof. Step right to the ledge, back left to the corner and follow it to the top.
|
|
Tom Williams
|
Main Area
The highest part of the cliff, the following routes are virtually all extremely exposed multi pitch adventures with highly variable rock quality (much of it tending to the chossy end of the spectrum). To get to these routes, look to the left, facing out, (east) from the lookout. A hideous line of ladders, chains, and assorted ironmongery greets the eye. This is the descent, which is only marginally better than it looks. Take GREAT care (or better yet, rope up). Looking towards the lookout from the top of the ladders, the striking corner line this side of the lookout is The Bolt Ladder. The Fear tackles the ridiculously steep territory on the arete to the left.
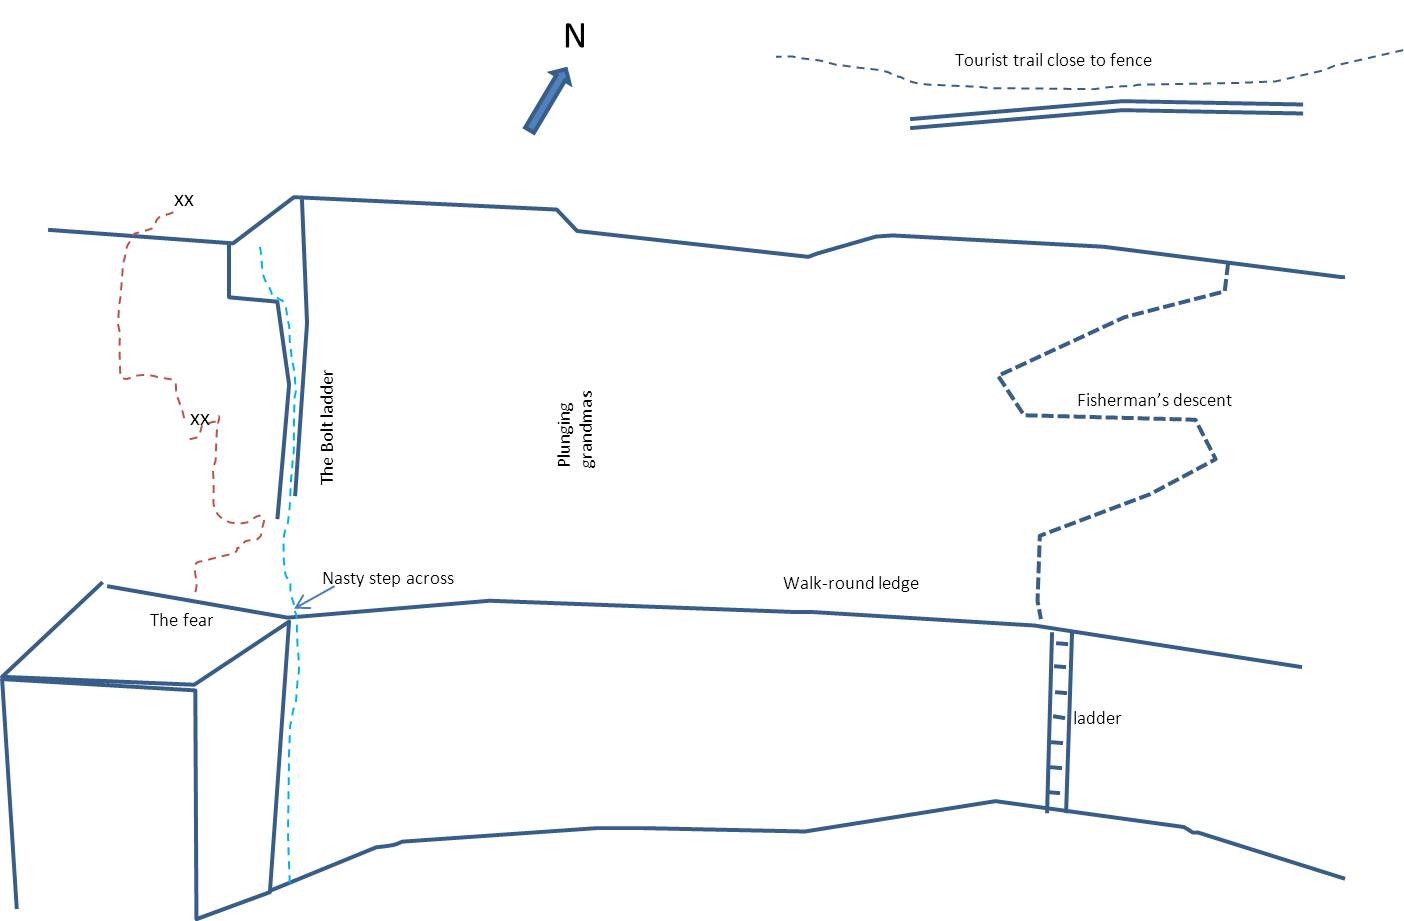
Climbs described left to right (west to east, then north), facing the cliff. The following 7 routes (up to and including The Bolt Ladder) are accessed via the obvious walk around ledge about 10m above the base of the ladders. Follow this towards the lookout, and you'll get to the "nasty step across" (where a corner cuts straight up through the ledge).
|
*
|
Honour Thy Father
|
22
|
60m
|
|
|
40m left of the nasty step across, just right of a left facing corner.
1. 20m (21) Step up and left into the corner. Follow this (manky BRs) to the belay (four BBs).
2. 25m (22) Move right then up (BRs). Head right around the arete (BRs) to the belay (BB).
3. 15m Up.
|
|
Mikl Law, Greg Child, Glenn Child 1980s
|
|
*
|
Big Craziness
|
23M1
|
50m
|
|
|
20m left of the nasty step across, below huge rooves high up.
1. 10m Head up and right to the ledge (single BB).
2. 15m (22) Follow the two thin cracks (manky BR) to the belay (BBs).
3. 25m (23) Move up and right to the crack that blasts out the monstrous roof. Blast out this, then aid up door handles (used to be two - one might be missing now) to thin crack. Follow this to the top.
|
|
Mikl Law 1980s
|
|
*
|
Destroy All Monsters
|
20
|
45m
|
|
|
1. 25m (20) As for BC, then continue up and right (BRs) to crack. Up this for 2m then traverse right to the arete. Follow this to the 1st belay on tF.
2. 20m (20) A very dangerous pitch. Up tF for 4m, then traverse right to a cave (BR). Move up then step right and around the arete to finish as for tBL.
|
|
Mikl Law Greg Child 1980s
|
|
* * *
|
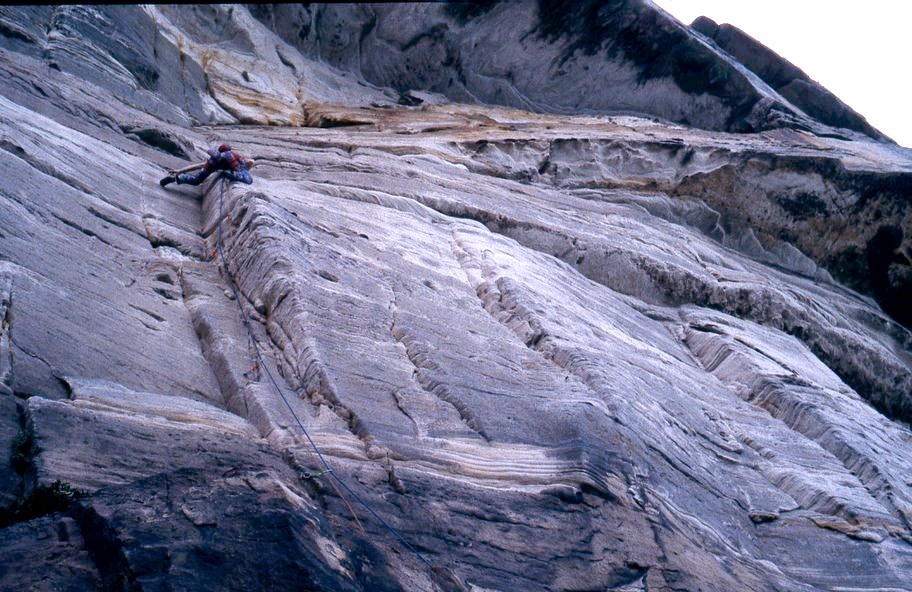
The Fear
|
17M1/19
|
42m
|
|
|
The climb Sydney is renowned for. Unbelievable exposure, and some wild moves make this an absolute classic. Unfortunately much of the climb is chossy, and despite having a plethora of bolts, only two of them are in decent condition (and one of those is on the 1st belay). Take a decent rack of gear for this trad climb. Take great care - this isn't a route for the inexperienced. Many seconds have had to be rescued falling off the start of P2, take (and know how to use) prussics.
About 5m past the nasty step across.
1. 20m (16) Follow the manky BRs (take wires - they're too big for hangers) up and right for about 10m (as for The Bolt Ladder). Traverse left under a nose of rock then mantle up to the base of a nice looking corner. Follow this (manky BRs) then traverse left at the top to a small belay cave (2 rusty BRs and 1 decent one). I'd also recommend clipping the first BR on the 2nd pitch as well.
2. 22m (17M1 or 19) Clip the good BR in the roof, then lean way out over the sucking void and do "the move" (or clip a sling into the BR and stand in it). Crank and dangle up the steep territory above (manky BR) to the base of a steep corner. Stem up this (manky BRs) to the roof. An easy and awesomely exposed traverse leads left under the roof (good cams at foot level) to a good stance at the lip (good mid sized cams in a deep horizontal). Savour the position, then launch up the steep and surprisingly pumpy headwall (cams and a manky PR) to the (hard!) top out mantle. BB and cam belay in front of the lookout.
|
|
Mike Law Gary Eggins 1980
|
|
* * *
|
The Bolt Ladder
|
20
|
35m
|
|
|
Good moves and position, but yet another climb with dubious pro. Take care. Many of the original bolts were chopped recently, but there are 3 reasonably new stainless steel bolts on the crux. Take a good selection of natural gear if you plan on doing this route.
1. 10m (16) Up as for TF, but continue to large belay ledge instead of traversing left.
2. 25m (20) A hard start to get into the corner, then continue up. Move left to the arete then up to the left trending roof / corner. Follow this out over the void then up the final short corner.
|
|
ADF 1970s FFA Mikl Law 1980
|
|
|
The Bolt Ladder Variant
|
20
|
30m
|
|
|
2. 20m (20) As for TBL, but continue straight up corner.
|
|
Mikl Law 1980s
|
The following three routes all start from ground level.
|
|
The Bolt Ladder Direct Start
|
21
|
35m
|
|
|
Directly below the nasty step across. Up the obvious corner to the nasty step across, and continue up through little roof to belay as for P1 of tBL.
|
|
Mikl Law 1980s
|
|
*
|
Plunging Necklines
|
24
|
60m
|
|
|
5m right of TBLDS.
1. 20m (22) Up corner to ledge. Step left to a thin crack, which is followed to the walk around ledge (BBs).
2. 20m (21) A very dangerous pitch which has seen at least one fatality. A hard start leads into (BR) a thin layback. Move 5m right to corner, and follow this up to belay (BBs and lawnmower blade on left).
3. 20m (24) Take care. Up the corner (BRs) around small roof (BRs) to "the move". Continue up to BBs (this section is runout, loose and deceptively tricky - be very careful).
|
|
Mikl Law 1980s
|
|
|
Sir Lawrence Whelk
|
20
|
15m
|
|
|
15m left of the descent ladders. Up the arete (3 manky BRs - take a wire for the last one).
|
|
Mikl Law 1980s
|
The following routes start from ground level, to the right (facing the cliff) of the descent ladders.
|
|
Bumbly's Revenge
|
21
|
15m
|
|
|
2m right of the decent ladders. Up the wall, passing 2 BRs.
|
|
|
|
|
Turds on the Move
|
20
|
12m
|
|
|
2m right of BR. Up wall, passing 3 BRs.
|
|
|
|
|
Drop Bears
|
19
|
55m
|
|
|
Corner 20m right of TOTM.
1. 20m (19) Up the corner then walk 10m left to the belay.
2. 35m (19) Tend right and up the loose and runout wall.
|
|
Mikl Law 1980s
|
|
*
|
Scrabble
|
18
|
30m
|
|
|
About 50m right of DB at base of manky descent ladders. Up the bottom ladder, then move left and up corner. Traverse off under rooves. Somewhat loose.
|
|
Mikl Law 1980s
|
|
|
Polluted Beaches
|
19
|
15m
|
|
|
2m right of S. Up the wall, passing 2 BRs.
|
|
|
|
|
Like Rain
|
21
|
18m
|
|
|
About 60m right of PB. Up shaly wall then out the big roof via the thin, diagonal crack. Up to ledge (manky BB).
|
|
Mikl Law 1980s
|
The following three climbs are located about 40m past the main arete of the headland (about 80m past LR). Scramble up the scree to start.
|
*
|
Beneath the Wonderdob
|
19
|
25m
|
|
|
At the far left hand end of the ledge that is the 1st belay of WW3 (BB). Either abseil in or climb P1 of WW3. Up weird rock (BR) then move left to arete. Up to top (cams).
|
|
Mikl Law 1980s
|
|
|
WW3
|
15
|
50m
|
|
|
Corner below gun emplacement.
1. 25m (15) Up the corner, then move right to easier ground. Up to belay in bunker. Poor protection. Move the belay 5m left.
2. 20m (15) Follow the diagonal crack, then move left to crack. Up this to belay on large ledge.
3. 5m Up to top.
|
|
Mikl Law 1970s
|
|
|
Moments of Glory
|
18
|
25m
|
|
|
1m right of P2 of WW3. Follow the line of BRs and cracks.
|
|
Mikl Law 1970s
|
|
*
|
Albatrocity
|
18
|
52m
|
|
|
6m right of P1 of WW3.
1. 25m (18) Up the thin crack. At the top, move right, up then back left to bunker.
2. 22m (18) Into corner 2m left of the bunker, then move right to the arete. Up this for 2m then move right (BR) and diagonally over roof. Move back left to a ledge. Dodgy belay (manky BBs and poor pro).
3. 5m Up to top.
|
|
Mikl Law 1980s
|
|
|
No Morays
|
19
|
40m
|
|
|
From the left end of the halfway ledge below the large slab. Rap in 4m right (facing out) of the stone wall. Not sure where this is exactly! Up and left (PR) to small block (BR). Continue up and right above roof, then up the slab above. Head diagonally right (BRs) to the top of the corner. Move right under roof, then up to top.
|
|
|
Northern Area
The following climbs are located about 500m north of the northern most lookout.
|
* *
|
Temporary Like Achilles
|
17
|
45m
|
|
|
The obvious big orange corner.
1. 15m Up and left to corner. Follow this to loose ledge, then move left to the base of the main corner.
2. 30m (17) Up the main corner (great rock).
|
|
|
|
|
Ultramarine
|
18
|
45m
|
|
|
The first wall past the arete north of TLA. Scramble up to start from an bushy ledge.
1. 20m (18) Step onto the narrow wall and follow it (hard moves and dubious protection - take care) to ledge in middle of wall.
2. 25m Up to top, tending left.
|
|
|
|
|
Nastrand
|
17
|
50m
|
|
|
80m right of TLA, below the main arete of the headland. Scramble up to a high, loose ledge below and to the left of the roof.
1. 25m (17) Climb up to small roof (loose). Tenuous moves to gain slab then continue up and left to corner. Up to ledge.
2. 25m (17) Continue up the brown wall then move right above the roof (dangerous) to the final crack. Follow it to the top.
|
|
|
Fairy Bower Wall
The following climb is located about 400m south of Fairy Bower, just past a small sandstone block wall running along the edge of the cliff. The cliff is quite prominent if you look south from the Fairy Bower carpark.
|
* *
|
Twilight's Last Gleaming
|
19
|
40m
|
|
|
In the middle of the wall. Hard start, then up the wall moving right to the right hand arete. One thin move higher up as well. A good route for the sea cliffs, although a bit sandy (which is to be expected).
|
|
Grag Child 1980s
|